参与开源软件开发
使用linux近8年时光了,我从开源社区学到很多知识,从学会安装linux,到使用各种软件,从事linux应用软件开发,再到linux内核驱动.不仅是在学校,还是在工作中,开源社区对我帮助很大,感谢那些无私分享代码的牛人,但我却一直因生活奔波没有时间去回馈社区.<做一名开源社区的扫地僧>给我不少的启发,选择一个项目,参与进去,才能真正感受开源带来的财富,不管是物质还是精神层面上的.不管怎样,Just do it.
使用NAT共享上网
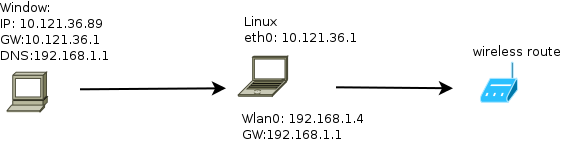
家里有一个台式机,但是没有无线网卡,必须使用网线连接路由器,但路由器在客厅,扯很长的网线很不方便.不过,我还有一台笔记本,上面装的是LINUX,所以想办法让台式机通过笔记本的eth口访问网络,那么就需要在笔记本上搭建一个NAT转发.
在linux上,使用IPtables轻松搞定这一切.组网图大致如下:
第一种方法:
IPtable设置如下:
# all interface
export WAN=wlan0
# 获取无线网口的IP地址
export WAN_IP=`ifconfig ${WAN} | grep "inet addr" | awk -F: '{print $2}' | awk '{print $1}'`
export LAN=eth0
# 获取路由器的地址
export REAL_GW=`route | grep default | awk '{print $2}'`

# remove all
# 清除NAT中的所有规则
iptables -t nat -F

# NAT settings
# 因为台式机(window)中的GW设置的是10.121.36.1,所以从笔记本上看LAN口收上来的包都是到10.121.36.1的,
# 这里就需要DNAT生效了,本质上是把数据包的目的地址给改掉,然后进入路由系统查找出端口
# 那么,下面这句话就是把去10.121.36.1的数据包,修改成${REAL_GW},这里是192.168.1.1
# 原有数据包头:
# SRC: 10.121.36.89  DST: 10.121.36.1
iptables -t nat -A PREROUTING -i ${LAN} -d 10.121.36.1 -j DNAT --to ${REAL_GW}
# 经过上面一句话后,变成
# SRC: 10.121.36.89 DST:192.168.1.1

# 然后,进入route table,找出端口,在笔记本(linux)上,192.168.1.1是default gateway.且是wlan0
# 所以数据包从wlan0走.
# 数据包终归要有ACK,如果192.168.1.1回应10.121.36.89这个地址的话,将找不到路由而在路由器上丢弃.
# 那么下面这句话,将源地址修改${WAN_IP},这里是192.168.1.4
iptables -t nat -A POSTROUTING -o ${WAN} -s 10.121.36.0/24 -j SNAT --to ${WAN_IP}
# 最终,出wlan0的数据包就是:
# SRC: 192.168.1.4 DST: 192.168.1.1

数据包从wlan口回来的时候就执行反操作.把数据发送给台式机(windows).
OK,一切正常.我不需要更复杂的设置了,如果大家有兴趣,请参考<更安全的linux网络>这本书.
第二种方法:
iptables -t nat -A POSTROUTING -s 10.121.36.0/24 -j MASQUERADE
网友依云http://lilydjwg.is-programmer.com/提供.
快速参考:
刘苏平的博客 http://www.liusuping.com/ubuntu-linux/iptables-firewall-setting.html
IPSec简介
介绍
IPsec是一种虚拟网络的应用,可以将internet虚成企业网来用,比如,公司在上海和北京都有办公区,两边为了能互相访问方便,一种解决方法是租用一条专用路线,物理上保证带宽和传输安全性,但是这样造价很高,有了VPN可以在inetenet上做一个逻辑层面上的网络,数据在彼此交换都使用AH或ESP方式对IP头部/载荷进行加密认证.这样保证了传输的安全性,但带宽就不好保证了, 总体来说VPN是较好的解决方案,节省成本.
工作模式
IpSec工作在两种模式下:传输模式, 隧道模式.区别与隧道模式,传输模式对IP头部不再次封装,而隧道模式会根据配置规则把原始数据包封装到一个新的IP数据包中.
加密方式
IPsec支持AH/ESP两种加密方式.
严格的来说, AH不是一种加密方式,而是对数据的校验或称数字签名.校验范围如下:
+------------+-----------+------------+
| ip header | AH header | ip payload |
+------------+-----------+------------+
| ------- verify scope ---------------|
发送过程中,增加一个AH头部,使用hash算法将IP头部+IP数据区进行校验生成fingerpoint,然后对fingerpoint加密填入AH header中.
这种校验方式可以防止数据传输过程被第三方篡改,但IP数据区的数据还是明文,并没有真正加密.
ESP则是真正意义上的加密.对数据加密后,数据区就会变成密文,无法直接识别,需要解密之后才能处理.
编程大赛
从周五开始,我们小组有三人参与的编程大赛。大赛的题目是这样的:编写一个AI机器人,又叫聪明的搬运工。在给定的地图上走最短的距离背更多的包裹,每次搬运完一个包裹就会奖励同包裹重量等值的金币,每走一步、拣起、放下包裹浪费一个金币。如果搬运工撞墙、掉进河里、超过回合数都会被server踢出去。
早上9点,大赛组委会发送题目到每个小组的邮箱中,由于没有限制场地,参加小组比赛的队员和我们是坐在一起的,我也被邀请做后备队员,在旁边"敲敲边鼓"。当我看到这个题目的时候,就想到A*、背包、旅行商的经典算法,在这个游戏里需要将三个算法的结果再做一次取优。可惜,我只知道这些算法名字,有大概的了解,但不清楚如何去做。在和队员讨论中,我还不确定A*算法是否能用来做寻路的算法。赶紧的查询网络,把A*算法伪代码反复看来几遍,发现貌似和数据结构中图有关,两个节点之间必须有权重(说实话我没有认真看)。在和队员讨论过程中,我不敢确定A*算法是否能解决,我只是提示一下。
最后,队员们和我没有去理会A*算法,我们考虑到是否要用找迷宫的方法,确定包裹与包裹目的地址的最短距离,然后我们陷入解决递归和未知大小的结果集如何裁减。整个上午我们在讨论这个问题。最终没有结论。
还好,上午,另一名队友已经熟悉了游戏server与我们Client的交互,整理游戏中除算法外的数据结构。
下午,正在我们找不到如何解决最短路径问题的时候,我们的主管把我们队和另外一个同部门的队伍拉到会议室,集中把A*、背包、旅行者算法讲了一遍,并给出资料。 这算不算作弊?嗯,还好吧,搞不好其它部门也在这么搞。我们又不是什么游戏公司,平时大家对算法还真不熟悉,很多甚至不是计算机科学与技术专业的。好吧,万事具备,只欠编码了。
行动吧,队员们开足来马力,用了一个下午+一个晚上(PS:晚上通宵),把算法编写完毕了。
第二天是周六,我到公司的时候,队员们还在奋战,精力旺盛啊!!!
据说周五晚上因为内存分配失败,定位了5个小时,o,用C的悲哀,用不好C的悲哀。。。
周六,没有什么奇迹,遇到的问题都比较小,代码编写的不规范,导致后期调试相当痛苦,一直找不到错误,我也加入了调试过程,代码逻辑不轻,让我感觉很无奈,看不出来哪里有问题,我甚至想重新编写一遍。
下午5:30,我们交卷了,最终还是没有运行起来。
我们小组最终以失败告终,但小组成员却还处在亢奋状态,一点没有失败的感觉。到交作品的时候,我们还没有调试完。
比赛中也暴露出我们编程能力逐渐消失的危机,在公司里面整天维护100万左右的代码,没有亲自增量设计过,平均每天代码编写量不超过5行(保守估计),这怎么能算是程序员?一个朋友说:“整天不写代码的程序员不是程序员”,这次编程大赛见证了我们的现在能力是如何的差劲。
使用C编写windows服务程序(Five Steps)
Windows services are convenient for running background apps and for performing tasks that don't require user interaction. And C (not C++) is the best choice for learning the basics of these console applications. Build and implement a simple service to query the amount of available physical memory and write the result to a text file. Then use what you've learned to write your own Windows services.
hen I had to write my first NT service, I went to MSDN and looked for samples. There, I found "Creating a Simple Win32 Service in C++, an article by Nigel Thompson with an example written in C++. Though the article explained the process quite well, I still felt I was missing important information. I wanted to understand what functions are called, by what framework, and when, but C++ didn't make this easy. The object-oriented approach was convenient, but since calls for low-level Win32 functions are encapsulated by class, it is insufficient for learning about the essence of the Services. This is why I feel C is more suitable for the first steps in writing services or for implementing services that perform simple background tasks. C++ is worth using only after you gain a more thorough understanding of the subject. When I had to leave the place I worked and I had to transfer my knowledge to another person, it was very easy to explain the essence of NT services using my examples written in C.
A service is a console application that runs in the background and performs tasks that don't require user interaction. The Windows NT/2000/XP operating systems offer special support for service programs. The installed services can be configured through the Services applet, available from the Control Panel in Windows NT or from Control Panel | Administrative Tools in Windows 2000/XP. Services can be configured to start automatically when operating system starts, so you dont have to start each of them manually after a system reboot.
This article explains how to create a service that periodically queries the amount of available physical memory and writes the result to a text file. The next sections guide you through the process of building, installing, and implementing the service.
Step 1: The main Function and Global Definitions
First, include the required header files. The program invokes Win32 functions (windows.h) and writes to file on disk (stdio.h):
#include <windows.h>
#include <stdio.h>
Next, define two constants:
#define SLEEP_TIME 5000
#define LOGFILE "C:\\MyServices\\memstatus.txt"
SLEEP_TIME specifies the time period in milliseconds between two consecutive queries for available memory. Use this constant in Step 2, when writing the worker loop of your service. LOGFILE defines the path to the log file for the memory queries results that you output using the WriteToLog function:
int WriteToLog(char* str)
{
   FILE* log;
   log = fopen(LOGFILE, "a+");
   if (log == NULL)
      return -1;
   fprintf(log, "%s\n", str);
   fclose(log);
   return 0;
}
Declare several global variables to share their values across multiple functions of your program. Also, make the forward definitions of functions prototypes:
SERVICE_STATUS          ServiceStatus;
SERVICE_STATUS_HANDLE   hStatus;

void  ServiceMain(int argc, char** argv);
void  ControlHandler(DWORD request);
int InitService();
Now, that the preparation work is done, you can start coding. Service programs are a subset of console applications. Therefore, you begin by defining the main function, which is the entry point to the program. In case of services, the code for main will be surprisingly short, since it just creates the dispatch table and starts the control dispatcher:
void main()
{
   SERVICE_TABLE_ENTRY ServiceTable[2];
   ServiceTable[0].lpServiceName = "MemoryStatus";
   ServiceTable[0].lpServiceProc = (LPSERVICE_MAIN_FUNCTION)ServiceMain;

   ServiceTable[1].lpServiceName = NULL;
   ServiceTable[1].lpServiceProc = NULL;
   // Start the control dispatcher thread for our service
   StartServiceCtrlDispatcher(ServiceTable);
}
A program may contain several services. Each of them must be listed in the special dispatch table (this program defines ServiceTable array for this purpose). Each entry in this table is in the SERVICE_TABLE_ENTRY structure, which has two fields:
- lpServiceName: a pointer to a string with a service name; must be specified when multiple services are defined.
- lpServiceProc: a pointer to a service main function (entry point of a service).
The last entry of the dispatch table must have NULL pointers for the service name and service main function fields. In this case, the program only hosts a single service, so defining the service name is optional.
The Services Control Manager (SCM) is the process that manages all the services in the system. When the SCM starts a service, it waits for the main thread of a process to call the StartServiceCtrlDispatcher function. Pass the dispatch table to StartServiceCtrlDispatcher. This transforms the main thread of the calling process into the control dispatcher. The dispatcher starts a new thread that runs the ServiceMain function of each service in the dispatch table (in this case, only one service). The dispatcher also monitors the execution of all the services in the program. The dispatcher then passes the control requests from the SCM to the service.
NOTE: If the StartServiceCtrlDispatcher function is not called for 30 seconds, an error is reported. To avoid this, initialize a service inside the ServiceMain function (as in the example) or in a separate thread rather than in the main function. The service described in this article does not require such precautions.
The StartServiceCtrlDispatcher call returns after all of the services in the dispatch table have finished executing (for example, after a user stops them from using the Service applet), or when an error occurs. The main process then terminates.
Step 2: The ServiceMain Function
Listing 1 shows the code for ServiceMain. This function is the entry point of a service. It runs in a separate thread, which is created by the control dispatcher. ServiceMain should register the control handler for a service as soon as possible. Do this by calling the RegisterServiceCtrlHadler function. You will pass two arguments to this function: the service name and the pointer to the ControlHandlerfunction.
This instructs the control dispatcher to invoke the ControlHandler function to handle SCM control requests. After registering the control handler, obtain the status handle (hStatus). Use hStatus to report the service's status to the SCM by calling the SetServiceStatus function.
In Listing 1 shows how to initialize the ServiceStatus structure specifying the service characteristics and its current state. Each ServiceStatus structure fields has a purpose:
- dwServiceType: indicates the type of service. Author Win32 service; assign the SERVICE_WIN32 value.
- dwCurrentState: specifies the current state of the service. Since initialization of a service has not been finished at this point, set the SERVICE_START_PENDING status.
- dwControlsAccepted: this field will inform the SCM which fields the service accepts. In this case, allow STOP and SHUTDOWN requests. Handling control requests is discussed in Step 3.
- dwWin32ExitCode and dwServiceSpecificExitCode: these fields are useful when you are terminating the service and want to report the detailed exit code. Since, you will initialize the service and will not exit, assign 0 values.
- dwCheckPoint and dwWaitHint: these fields indicate the progress of a service when it performs an initialization longer than 30 seconds . This service has a very short initialization procedure, so assign 0 values to both fields.
Report the service's status to the SCM by calling the SetServiceStatus function. This supplies the hStatus handle and the ServiceStatus structure. Notice that ServiceStatus is global, so you can use it across multiple functions. In the ServiceMain function, you assign values to several structure fields that will remain unchanged during the whole run of service, such as dwServiceType.
After reporting the status of the service, you can proceed to the initialization. Do this by calling the InitService function. This function simply adds the Monitoring started. string to the log file. Here is the code:
// Service initialization
int InitService()
{
   int result;
   result = WriteToLog("Monitoring started.");
   return(result);
}
In ServiceMain, test the return value of the InitService function. If there was an initialization error (in this case, it may happen if writing to the log failed), set the service status to stopped and exit the ServiceMain:
error = InitService();
if (error)
{
   // Initialization failed; we stop the service
   ServiceStatus.dwCurrentState = SERVICE_STOPPED;
   ServiceStatus.dwWin32ExitCode = -1;
   SetServiceStatus(hStatus, &ServiceStatus);
   // exit ServiceMain
   return;
}
If initialization was successful, report the running status to the SCM:
   // We report the running status to SCM.
   ServiceStatus.dwCurrentState =
      SERVICE_RUNNING;
   SetServiceStatus (hStatus, &ServiceStatus);
Next, start the worker loop. Every five seconds, query the available physical memory and write the result to the log file.
As seen in Listing 1, the loop continues until the current state of the service is SERVICE_RUNNING or until an error writing to the log file occurs. The state may be altered by the ControlHandler function in response to a SCM control request.
Step 3: Handling Control Requests
In Step 2, you used the ServiceMain function to register the control handler function. The control handler is very similar to the window callback function that processes various Windows messages. It checks what request was sent by the SCM and acts accordingly.
Each time you call the SetServiceStatus function, you must specify that the service accepts the STOP and SHUTDOWN requests. Listing 2 shows how to handle them in the ControlHandler function.
The STOP request is sent when the SCM stops the service. For example, if the user manually stops the service from the Services applet, the SHUTDOWN request is issued to all running services by the SCM, when the machine shuts down. Both cases are handled identically:
- Writing to the log file Monitoring is stopped.
- The SERVICE_STOPPED state is reported to the SCM.
Since the ServiceStatus structure is global to the whole program, the worker loop in ServiceMain stops after the current state changes and the service thread terminates. There are other control requests, such as PAUSE and CONTINUE, that are not handled in this example.
The control handler function must report the service status, even if that status remains the same, every time the SCM sends a control request. Hence, SetServiceStatus is called in response to all requests.
 |
|
|
Figure 1: The Services applet displaying the MemoryStatus service. |
Step 4: Installing and Configuring a Service
The program is ready and may be compiled into an exe file. I created MemoryStatus.exe and copied it into C:\MyServices folder on my computer. To install this service on your operating system, you'll need to use the SC.EXE executable, which comes with the Win32 Platform SDK tools. You will use this utility to install and remove the service. The other control operations will be done through the Services applet.
Here is the command-line to install your MemoryStatus service:
sc create MemoryStatus binpath= c:\MyServices\MemoryStatus.exe
Issue the create command. This specifies the service name and path to the binary file (notice the space between binpath= and the path). You can now use the Services applet to control the service (see Figure 1).
Start and stop the service using the toolbar of the applet.
 |
|
|
Figure 2: The Properties window for the MemoryStatus service |
The startup type of MemoryStatus is manual, which means that it will start only on-demand. Right-click on the service and choose Properties from the context menu, to get the properties window for the service (Figure 2). This is where you can alter the startup type along with other settings. You can also start/stop the service from the General tab.
To remove the service from the system, execute the following command:
sc delete MemoryStatus
Specify the delete option and the service name. The service will be marked for deletion and will be completely removed after the next restart.
Step 5: Testing Your Service
Start the MemoryStatus service from the Services applet. If there are no initialization errors, the execution should start successfully. Wait for a while, then stop the service. Examine the service's output in the memstatus.txt file under the C:\MyServices folder. On my computer, I obtained the following:
Monitoring started.
273469440
273379328
273133568
273084416
Monitoring stopped.
To test the behavior of the MemoryStatus service in case of errors, you can make the memstatus.txt file read-only. In this setting, the service will not start.
Remove the read-only attribute, start the service, and reapply read-only. The service should stop its execution because writing to the log fails. If you refresh the contents of the Services applet, you will see that service status is stopped.
On to Bigger and Better Servcies
Understanding the basic concepts of Win32 services, allows you to better use C++ for designing a wrapper class. A wrapper class hides the calls to the low-level Win32 functions and provides a comfortable generic interface. Alter the MemoryStatus program code to create your own services that fit your needs! To perform more complicated tasks than one demonstrated in this article, you can create multithreaded services to divide the job between several worker threads and monitor their execution from the ServiceMain function.
使用pygame编写游戏(1)
1. 介绍
游戏是编程应用较多的地方。即使是写一个最简单的游戏,你要熟悉UI制作,数学,物理学,甚至人工智能。这是一个练习编程的非常有趣的方式。
如果你是(或者不是)python语言的粉丝,你对游戏很感兴趣,那么pygame是一个非常棒的游戏编程库,你需要仔细的来学习它。它可以运行在所有的主流平台上,提供简单的工具函数就能处理复杂的图像处理,比如图像的移动、声音等。
网上有很多pygame的入门教程,但它们很多都是讲基本的。甚至Pygame book也属于介绍性级别的。为了更进一步提高对pygame的掌握,我决定写一个我自己的教程,希望能为使用pygame的人提供更进一步的合理学习。
本教程明确鼓励你去改进代码,并强烈推荐做一下后面的练习题,这些练习题可以让你对学到内容有更好的认知。
2. 写在前面
基于以上说的,这个教程并不适合初学者。如果你刚开始学习pygame,你可以看一下这些教程,推荐看这些基本的介绍教程。
在这里,我认为你具备以下知识:
1. Python(你可能不是它的高级用户,但也完全不是一个初学者)。
2. 数学和物理学的基本知识(向量,正方形,运动定律,概率等等)。我会解释所有非常见的知识点,但我不会教你怎么增加向量,等等。
3. 对pygame的认知。比如,你已经学习过我之前提到的介绍性的pygame教程。、
还有要说的是,我之关注2D游戏,3D游戏会是更高层次更复杂,我会提出一个不是很完整的3D游戏样本。
3. 让我们开始吧
在这个部分,我们完整写一个游戏样例:模拟爬虫,一些生物在屏幕上移动,从墙上弹回来,时不时的改变方向。

虽然这称不上是一个游戏,但这是我们实现更多不同想法的好的起点。I’ll leave myself the luxury of postponing the decision of which game it will eventually be, for now.
4. 代码
第一部分完整的代码包,包括需要的图片,可以在这里下载。我建议你下载下来并运行它。一遍看教程,一遍看代码将会对你非常有好处。我在python2.5.2,pygame1.8.1上测试过了,也可能会在其它版本上运行比较好。
5. pygame的文档
pygame的API文档很全。这里有pygame全部模块,类,常量,函数的列表,我建议对你不熟悉的类或者方法,多去查找这个文档。
6. 爬虫
好吧,我先明确以下该部分的目标:
- 我们想让爬虫能在屏幕上移动
- 爬虫的总数是可以轻易的配置的
- 爬虫碰到墙后能反弹
- 为让游戏更有趣,爬虫需要表现出半随机的动作
那么爬虫是什么?
爬虫是一张图片,在pygame的驱动下,能够移动或者旋转。由于图片的制作超出我的能力,我只让爬虫能够向左右上下移动,而45度方向移动无法实现。
爬虫的图片包含在下载包中的小的.png文件中。


注意到所有的爬虫图片头部方向都是一致的。
爬虫是怎么移动的?如果你确定读过一个基本的pygame教程(没有吗?),你会知道移动其实是一种幻觉。电脑屏幕上没真正移动的东西。其实,程序会对一系列图片以比人眼睛快的多的速度进行移位。每秒30次或更多次刷新,会让图片看上去更加平滑。为了实现周期性的刷屏,游戏有一个"game loop"
7. 游戏循环
和GUI程序一样,每个游戏都有一个“主循环”。在pygame中,使用了一个简单的循环,如下:
# The main game loop
#
while True:
    # Limit frame speed to 50 FPS
    #
    time_passed = clock.tick(50)

    for event in pygame.event.get():
        if event.type == pygame.QUIT:
            exit_game()

    # Redraw the background
    screen.fill(BG_COLOR)

    # Update and redraw all creeps
    for creep in creeps:
        creep.update(time_passed)
        creep.blitme()

    pygame.display.flip()
就如我说的,这是一个基本的python循环--直到用户点击关闭窗口后,会给出退出消息,响应pygame.QUIT处理退出。
循环执行频度如何?这要取决于对clock.tick的调用。clock是pygame.time.Clock的对象,在此之前已经创建。调用tick的意思是:在下一个1/50秒到来前主循环休眠。在实际生活中,这限制了游戏的速度为50FPS,这是有好处的。一方面,我们可以让游戏更加平滑真实,另一方面,可以使游戏不能占用太多cpu资源。你可以尝试修改这个值,比如,当此值小于10,那么这个程序将会是什么样呢?我们看练习1和3.
现在是时候去看看关于tick的文档了。
每次循环都会重绘背景颜色,并且所有的爬虫会更新绘制。最终,整个屏幕会使用flip进行刷新(你应该看看它的文档了)。
8. 在循环之前
现在让我们看看在主循环之前都做了那些事情:ow let’s see what comes before the main loop:
# Game parameters
SCREEN_WIDTH, SCREEN_HEIGHT = 400, 400
BG_COLOR = 150, 150, 80
CREEP_FILENAMES = [
    'bluecreep.png',
    'pinkcreep.png',
    'graycreep.png']
N_CREEPS = 20

pygame.init()
screen = pygame.display.set_mode(
            (SCREEN_WIDTH, SCREEN_HEIGHT), 0, 32)
clock = pygame.time.Clock()

# Create N_CREEPS random creeps.
creeps = []
for i in range(N_CREEPS):
    creeps.append(Creep(screen,
                        choice(CREEP_FILENAMES),
                        (   randint(0, SCREEN_WIDTH),
                            randint(0, SCREEN_HEIGHT)),
                        (   choice([-1, 1]),
                            choice([-1, 1])),
                        0.1))
开始的几行都是可以自说明的,我认为你已经了解如何初始化pygame,并且创建display对象。但是爬虫对象的创建呢?
爬虫是一系列爬虫对象的集合,这是整个游戏的心脏和灵魂。下面是爬虫类的声明和其构造函数的定义。
class Creep(Sprite):
    """ A creep sprite that bounces off walls and changes its
        direction from time to time.
    """
    def __init__(
            self, screen, img_filename, init_position,
            init_direction, speed):
        """ Create a new Creep.

            screen:
                The screen on which the creep lives (must be a
                pygame Surface object, such as pygame.display)

            img_filaneme:
                Image file for the creep.

            init_position:
                A vec2d or a pair specifying the initial position
                of the creep on the screen.

            init_direction:
                A vec2d or a pair specifying the initial direction
                of the creep. Must have an angle that is a
                multiple of 45 degres.

            speed:
                Creep speed, in pixels/millisecond (px/ms)
        """
构造函数的参数有详细的说明文档,你可以看到它们在爬虫被创建时如何匹配的。
creeps.append(Creep(screen,
                    choice(CREEP_FILENAMES),
                    (   randint(0, SCREEN_WIDTH),
                        randint(0, SCREEN_HEIGHT)),
                    (   choice([-1, 1]),
                        choice([-1, 1])),
                    0.1))
首先,我们传递screen surface给爬虫类。爬虫将使用它判读如何从墙上反弹回来,如何去绘制自己。
其次,爬虫可以从图片列表中任意选择一个(choice是一个标准的python模块),它有一个屏幕随机位置,随机的方向,移动速度被设定为0.1像素/每毫秒,或者说100个像素/秒。英文原地址 http://eli.thegreenplace.net/2008/12/13/writing-a-game-in-python-with-pygame-part-i/